 www.vbs-hobby.com
Anleitung: Astronauten-Helm
Instructions No. 1363 Instructions No. 1363 Difficulty: Advanced
Whether it's a motto children's party, carnival or Halloween - dressing up is always a lot of fun! To make the costume unique, you can easily make it yourself. It is very easy and on top of that a lot of fun! Here we show you how you can make the deceptively real astronaut helmet.
Material:
- 10 sheets fibre silk, white
- 1 balloon
- 2 decorative cardboard boxes (diameter approx. 5 cm)
- Handicraft paint, white
- Hot glue gun
- Double page Adhesive tape
- Scissors
- Ruler
- Waterproof Marker
- 2 bowls (for paste and for the balloon to hold)
- Pencil
- 1 household sponge or painting sponge
- 1 packet of wallpaper paste
- Newsprint
- Roll of aluminium foil
- Stirring tool
- Measuring jugs
- Water
- White plastic bag or white fabric

And it's that easy:
Mixwallpaper paste with a little less water than necessary (to increase the adhesive strength). Inflate the balloon and knot it - when inflated, it should be approx. 2 - 4 cm larger than the circumference of the child's head
Take a large bowl and place the balloon on it so that it cannot roll away. Place the balloon in the lower part with Permanent marker mark (approximately from the point where it tapers). Now tear the fibre silk into medium sized pieces. Next, rub the balloon with the paste and place the pieces of straw silk directly on it and smooth it down with your fingers. Make sure that the pieces overlap slightly and that you slightly exceed the mark only .
Allow the first layer or, if desired, the first two layers to dry well overnight or in a warm place. Next, apply 2 layers of newspaper and allow to dry. Now concentrate the paste a little bit more and apply again 2 layers of fibre silk and let it dry. Now tear the newsprint into large pieces and apply the same. Apply 2 more layers of fibre silk, alternating with a layer of newspaper. Allow the individual layers to dry well in between and always make sure that any unevenness is evened out.
Cut the knot on the balloon and remove the remains. Color the helmet with Handicraft paint and sponge and let it dry.
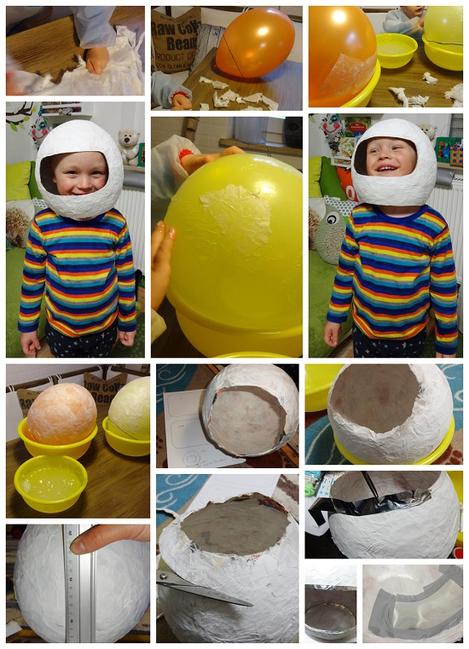
Measure the head height and adjust the helmet to it including the neck. Measure with a ruler and mark with a pencil. Mark the height around the helmet and then cut it out. Print out the pattern sheet (template), cut it out and place it in the middle of the helmet (be sure to observe eye level). Now mark with a pencil and cut out afterwards
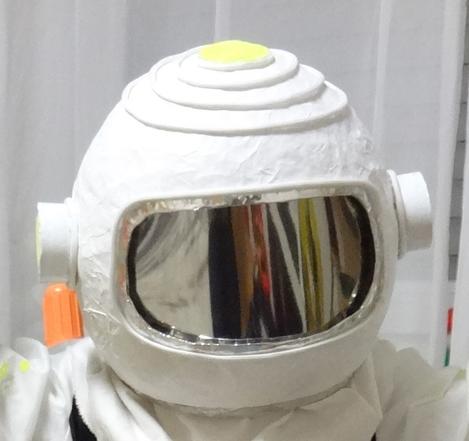
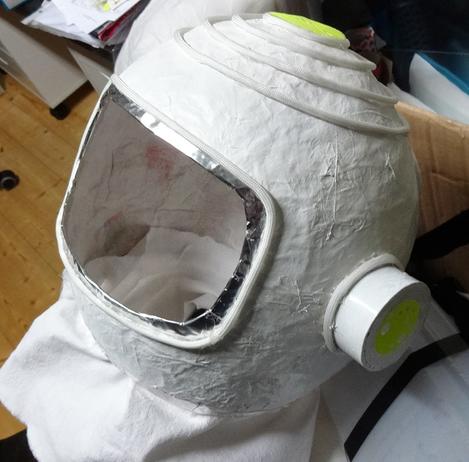
Paint the round boxes white and let them dry. Then glue them with the glue gun on the right and left
Cut 6 strips from the aluminium foil: two strips measuring approx. 2 cm x 19 cm, two strips measuring approx. 2 cm x 9 cm and two strips measuring approx. 2 cm x 30 cm.
Stick double-sided Adhesive tape on the visor edge and stick aluminium foil strips(the strips with the dimensions 2 cm x 19 for the long sides, those with the dimensions 2cm x 9cm for the short sides). It is best to start on the front side and let it protrude 1 cm. Make small cuts at the back with a distance of about 2 cm (so that the Paper fits better) and stick them on as well. Glue the remaining strips to the neckline.
To make the helmet look even more authentic, you can stick a piece of white fabric or a white plastic bag around the neckline. When doing so, fold the fabric slightly and apply it with the hot glue.
Tip: If you would like to make the helmet a little more elaborate, you can decorate it additionally with glow-in-the-dark stickers or paracord that glows in the dark. You can also use a mirrored spy window film to attach a visor.


