- Secure order
- Easy return shipment
- Service-Hotline +31 20 809 5778
Instructions No. 3350
Difficulty: Beginner
Working time: 2 Hours
The wedding is a unique and unforgettable moment in a couple's life, and the Preparations: for it are as exciting as they are challenging. In our DIY-Wedding series, we accompany you with creative ideas and instructions for the perfect stationery. From the first "Save the Date" to the emotional wedding invitation - we'll show you how to create lasting memories with loving details. Let our step-by-step guide inspire you and find out how to make your wedding cards a real highlight.
And not only the actual invitations are important, but also the "Save the Date" cards, which announce the important date to your guests in advance. These cards are the first announcement of your big day and create anticipation in advance.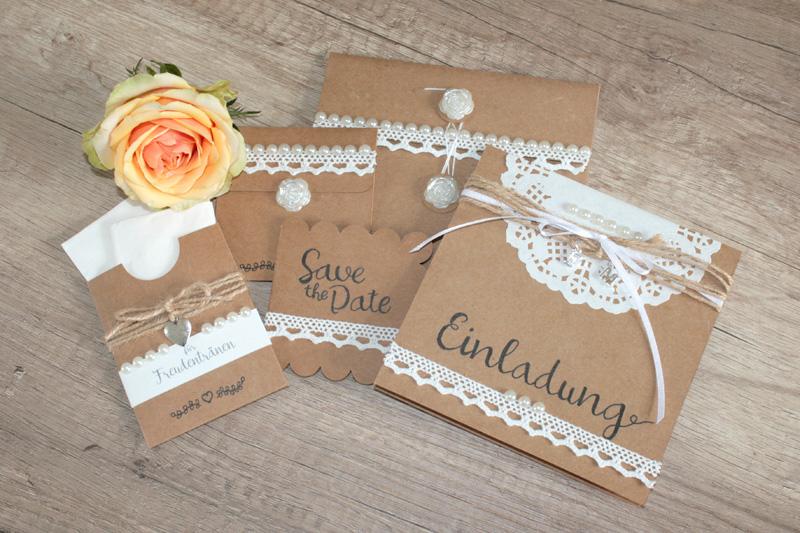
Stationery for the wedding - get creative with Save the Date

Step 1: Design creative save the date cards
Start with the outside of the card and outline "Save the Date" in your desired font in pencil. Perfect the positioning and then trace the lettering with a pen. Allow everything to dry well before removing the guide lines.
To design the inside, create a personalized calendar page on the computer and mark the wedding date with a heart. Print this design onto linen card, cut it out and stick it inside your card.
On the outside, attach a strip of double-sided adhesive tape, under the lettering, stick lace trim to it and trim it to fit. Decorate the envelope flap with the braid, before drawing a heart as a decoration. A self-adhesive rose serves as a stylish closure for the envelope.


Step 2: Elegant invitation cards for the wedding
Note: The invitation card opens downwards. As with the "Save the Date" cards, start with the handwritten design on the inside. Use precise guide lines to achieve a centered placement.
Next comes the decoration with the lace border and lace paper. Attach the lace paper in the top center and the braid underneath with double-sided adhesive tape .
Once dry, wrap the jute cord around the card several times, thread letter beads and tie a knot in the cord . satin ribbon adds a central bow to the cord decoration. Finally, half pearls add radiant accents.
For the text on the inside, design it on the computer, print it out and stick it onto the card.
Finish off the envelope with lace trim, half pearls and decorative elements similar to the previous example.


Step 3: Handkerchief envelopes "For tears of joy"
These special handkerchief envelopes are ideal for drying tears of joy during emotional moments at your wedding. Create the saying "For tears of joy" on linen paper, apply it to the sleeve and decorate the edge with half pearls. Jute cord and a small heart round off the design. 
Have fun getting creative and creating your very own stationery for that special day!
Start designing your unique wedding cards and more now! Discover all the materials you need in our online store and make your wedding an unforgettable experience.